Field Chooser - Assets Page
The Assets Data page contains a Field ChooserThe Field Chooser is a dialog window. Use the Field Chooser to add or remove optional fields to the page's grid., which allows you to add or remove optional fields from the page's grid. To open the Field Chooser:
- Select the Field Chooser icon
 .
. - The Field Chooser appears. It contains the optional fields at the Assets Data page.
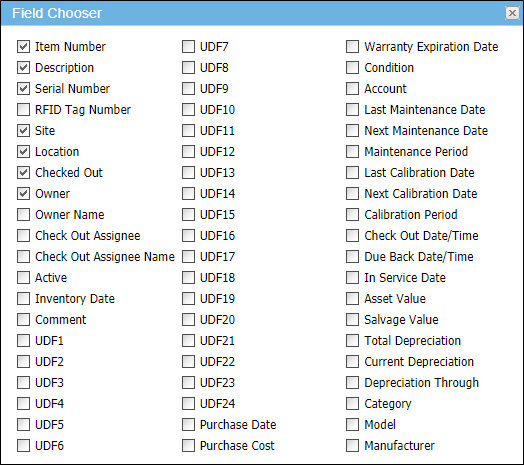
- The following fields are automatically selected in the Field Chooser. They appear in the Assets Data page by default.
- Item Number
- Description
- Serial Number
- Site
- Location
- Checked Out
- Owner
Adding or Removing Optional Fields in the Assets Data Page Grid
Warning: The Field Chooser has many options. Be aware that the page grid size is limited. If you add all of the optional fields to the grid, the fields will be small and visibility difficult.
Certain fields at the Assets Data page are optional. You may add or remove an optional field from the page's grid via the Field Chooser. They include:
- Item Number
- Description
- Serial Number
- RFID Tag Number (available when the default division uses RFID)
- Site
- Location
- Checked Out
- Owner
- Owner Name
- Check Out Assignee
- Check Out Assignee Name
- Active
- Inventory Date
- Comment
- UDF1
- UDF2
- UDF3
- UDF4
- UDF5
- UDF6
- UDF7
- UDF8
- UDF9
- UDF10
- UDF11
- UDF12
- UDF13
- UDF14
- UDF15
- UDF16
- UDF17
- UDF18
- UDF19
- UDF20
- UDF21
- UDF22
- UDF23
- UDF24
- Purchase Date
- Purchase Cost
- Warranty Expiration Date
- Condition
- Account
- Last Maintenance Date
- Next Maintenance Date
- Maintenance Period
- Last Calibration Date
- Next Calibration Date
- Calibration Period
- Check Out Date/Time
- Due Back Date/Time
- In Service Date
- Asset Value
- Salvage Value
- Total Depreciation
- Current Depreciation
- Depreciation Through
- Category
- Manufacturer
- Model
Required Field at the Assets Data Page
The Asset field is REQUIRED at the Assets Data page. It does not appear in the Field Chooser and it cannot be removed from this page.
Adding or Removing Optional Fields via the Field Chooser
The Field Chooser lists all of the optional fields found in the Assets Data page. You are able to add or remove a field to the page grid by using the Field Chooser.
- Select Assets > Assets Data from the navigation pane; the Assets Data page appears.
- To open the Field Chooser, select the Field Chooser icon found above the page’s grid, to the right. The Field Chooser appears.
- To REMOVE an optional field from the page, UNMARK the checkbox to the left of the field.
- Once removed, a field may be added back to the page by marking the checkbox to the left of the field.
- To ADD an optional field to the page’s grid, mark the checkbox to the left of the field.
- When you are finished with the Field Chooser, select the Windows Close icon (x) in the top right corner of the Field Chooser to close it.
- The fields displayed in the page’s grid are now based on the fields selected in the Field Chooser. They will remain in place until they are changed.